
BPM
Audio Metronome and Beat Marker System

BPM is an After Effects plugin that serves two purposes:
Firstly, it's a fully configurable audio metronome.
Secondly, it can create beat markers on it's layer. The markers can then be used to help cue up layers and effects, and to help navigate around the timeline while keeping in time with your audio.
IMPORTANT NOTE: BPM is not currently compatible with Apple Silicon computers unless they are running After Effects in Rosetta compatibility mode.
Overview
BPM's metronome feature is fully configurable.
Simply set the tempo and the number of beats per bar and preview your comp to hear the metronome.
The pitch and volume of the beats can be adjusted, and the accent beat (beat one) can be adjusted seperately.
You can also choose between 'click', 'blip', or 'boop' sounds. (short, medium, and long).
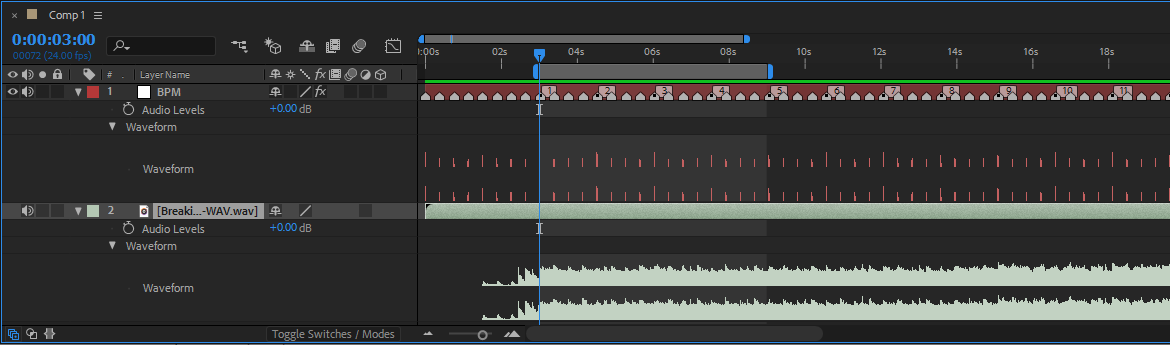
Once you're happy that your tempo is correct, you can generate beat markers on the layer allowing you to easily snap layers and keyframes to the beat markers and navigate quickly between beats using the 'J' and 'K' keys.
BPM can be added to any layer type. If the layer has audio, the metronome audio will be mixed in.
If you wish to match the metronome to an existing audio track, a good option is to use a null layer, that way you can easily move the layer to match up to beat one of your audio track, then adjust the tempo until it matches you audio track.
There are also options for bar numbering and lead-in bars.
Note that the marker system does not automatically update for performance reasons. Simply click 'Generate' each time you change the settings.
Usage
Create a layer and add the BPM effect.
You'll find the effect under the NatLab category in the effects panel, or type BPM in the effects search box.
The effect can be added to any kind of layer. If the layer has audio, the metronome audio will be mixed in.
Note that if you do add the effect to a layer with audio, it will need to start on a beat, otherwise you'll have trouble syncing the metronome with it.
Alternatively, add the effect to a seperate layer, that way you can move it independently to sync it up.
A null layer is a good option. (Tip: Hide the layer to remove the null box in the viewport)
If you're trying to sync with an audio layer, position your layer in-point to the first beat of your audio.
Select your BPM, and number of beats per bar.
Preview your comp, and once you're happy the metronome is in sync you can switch it off if you don't need it.
To create markers, click the Generate button in the Marker Options.
Markers are not automatically updated. Each time you change the settings you'll need to click Generate to update them.
You can now snap layers, the playhead, and keyframes to the markers (hold shift while dragging).
Use 'J' and 'K' to move to the previous/next marker.
Right click on a marker and select "Go to marker time".
Parameters:
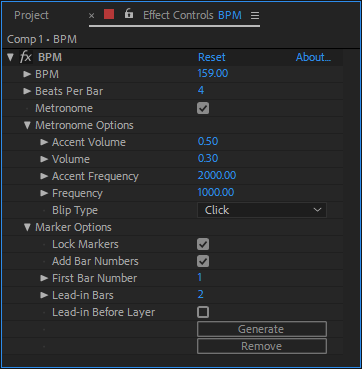
- BPM
The beats per minute of the metronome / your audio. Defaults to 120.
- Beats Per Bar
The number of subdivisions per bar. Defaults to 4. Because everything is in 4/4 these days.
- Metronome
Switches the metronome on / off. Defaults to on.
Metronome Options
- Accent Volume
The volume of the first blip of each bar. Defaults to 0.5.
- Volume
The volume of the other blips. Defaults to 0.3.
- Accent Frequency
The pitch of the first blip of each bar. Defaults to 2000 Hz.
- Frequency
The pitch of the other blips. Defaults to 1000 Hz.
- Blip Type
Click (short), Blip (medium), or Boop (long). Defaults to Click.
Marker Options
- Lock Markers
Sets whether the markers are locked in place or not. Defaults to Checked.
- Add Bar Numbers
Sets whether to add bar numbers to the markers. Defaults to Checked.
- First Bar Number
The number to start counting from. Defaults to 1.
Useful if you need a BPM Marker layer for a particular segment of a song.
- Lead-in Bars
The number of bars before counting begins. Defaults to 0.
Useful if you want a count-in before the audio starts. (click.. click... click... click... GO!)
- Lead-in Before Layer
Sets whether the lead-in bars are before or after the layer in-point. Defaults to Unchecked.
- Generate
Create the markers.
The effect is not dynamic, and will not create any markers until you click the Generate button.
Also worth noting that if markers already exist on the layer, they will be removed before new ones are added. This can take a few seconds.
- Remove
Remove all markers. (This can take a few seconds)
Notes
The markers are not dynamic since creating and removing markers can take a few seconds, especially if there are a lot of them. No markers will be generated or changed until you click the Generate button.
If markers already exist on the layer, they will be automatically removed before new ones are added.
Markers are locked by default to stop you accidentally dragging them around. They can be unlocked in the effect (Lock Markers checkbox) or by right clicking on a marker and selecting "lock markers".